Colors are defined in the color
tabs of the element settings
dialog boxes. For example, in a text element, the Fill color tab displays the controls needed to define the inner color of the text element.
Note:
by right-clicking the color preview box, a popup menu is displayed
that enables you to copy, paste,
and reset
the color to
its default value.
The color definition tabs enable you to define a solid
color (a single solid color with no fading) and a fading
color (two fading colors supporting opacity).
Note:
The Fading mode will be available only when applicable. For example, in the case of a barcode foreground color it will not be possible
to set a fading color. In these cases the Solid/Fading
button will not be visible.
The Solid
and Fading
working modes display the following controls:
Solid: a color selection area is positioned in the top section: by clicking it, you will select the color on which the mouse cursor is positioned.
To the right, the brightness
bar enables you to change the color range of the color selection area.
In the lower section, the Red, Green and Blue text boxes enable you to manually enter the RGB values that define the color (valid values range from 0 to 255).
The lower rectangle displays the selected color.
Fading: when in this working mode, the dialog box is split into two identical sections; each of which enables you to define one of the two colors that will be combined into the desired fading effect.
In the upper part of each section, you will find the color selection area, the brightness bar and the opacity
bar, that enable you to define an opacity value between 0 and 255 (where 0 is completely transparent and 255 completely opaque).
Each of the two sections displays the RGB text boxes and the opacity text box.
You can copy one color definition to the other by clicking the «
and »
buttons.
The lower section of the dialog box displays the preview area showing the chosen combination. To its right are found the controls that enable you define the fading angle. Again, you can manually enter a value (between 0 and 359.9 degrees) or use the scroll bar.
Note: Fading mode is not available in the Light version.
Once the desired combination has been found, click Ok or Apply
to confirm the changes, or Cancel to roll back.
Manage Cookie Consent
To provide the best experiences, we use technologies like cookies to store and/or access device information. Consenting to these technologies will allow us to process data such as browsing behavior or unique IDs on this site. Not consenting or withdrawing consent, may adversely affect certain features and functions.
Functional
Always active
The technical storage or access is strictly necessary for the legitimate purpose of enabling the use of a specific service explicitly requested by the subscriber or user, or for the sole purpose of carrying out the transmission of a communication over an electronic communications network.
Preferences
The technical storage or access is necessary for the legitimate purpose of storing preferences that are not requested by the subscriber or user.
Statistics
The technical storage or access that is used exclusively for statistical purposes.The technical storage or access that is used exclusively for anonymous statistical purposes. Without a subpoena, voluntary compliance on the part of your Internet Service Provider, or additional records from a third party, information stored or retrieved for this purpose alone cannot usually be used to identify you.
Marketing
The technical storage or access is required to create user profiles to send advertising, or to track the user on a website or across several websites for similar marketing purposes.

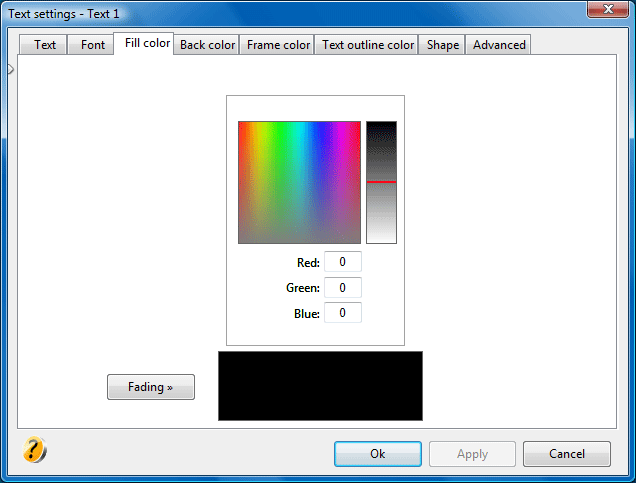 Solid: a color selection area is positioned in the top section: by clicking it, you will select the color on which the mouse cursor is positioned.
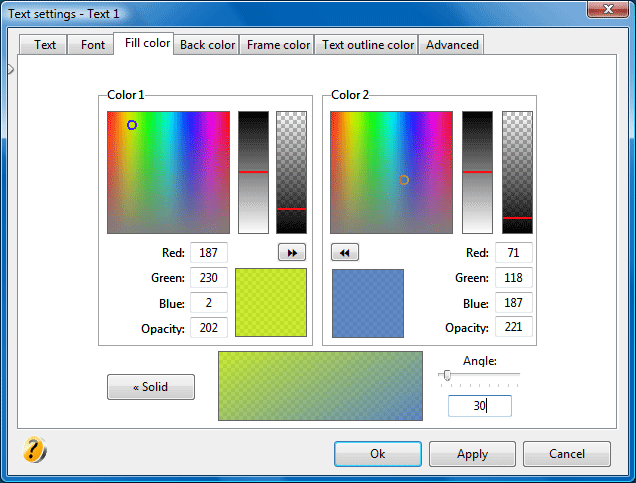 Fading: when in this working mode, the dialog box is split into two identical sections; each of which enables you to define one of the two colors that will be combined into the desired fading effect.