Generating GS1-128 barcodes
GS1-128 was defined to provide a global standard for information interchange throughout the supply chain. This standard is represented as one or more barcode symbols encoding data and containing information about the shipped goods, such as global unique identifiers, quantity, weight, expiration dates, and much more.
GS1-128 is not a barcode symbology, but rather a collection of Application Identifiers (AI) that define specific pieces of information and contexts.
Full Application Identifier list
Once the information has been defined, it is encoded using the Code 128 barcode symbology. A special character (FNC1) is used at the top of each GS1-128 barcode symbol and as a terminator character for Ais with variable length.
More info about Barcode Generator Software
1 – GS1-128 and Labeljoy
Labeljoy can generate GS1-128 barcodes (both in Full and Trial Version) and will solve most of the complications associated with generating fully compliant GS1-128 barcode symbols, in the background.
This includes:
- Simplified data enter
Just enter the AI sequence in readable format and Labeljoy will validate it through the internal GS1-128 engine and either generate the corresponding symbol or display an error message explaining the problem. - Modulo 10 check digit generation
If the AI requires a check digit, just enter any number. Labeljoy will replace it with the corresponding Modulo-10 check digit. - AI sequence validator
AI concatenation is subject to comply with certain rules. For example, when using AI 02 (Number of containers) the symbol should also encode AI 00 (Serial Shipping Container Code) or AI 37 (Number of Units Contained). Labeljoy will optionally check if the AI sequence entered is fully compliant. - FNC1 management
The FNC1 special character is added automatically wherever needed.
Basically, you just have to enter your AI sequence and data. For example, when entering the text (00)123456789012345678, Labeljoy will create a GS1-128 barcode symbol that will comply with the Application Identifier (00) Serial Shipping Container Code (SSCC-18).

GS1-128 symbol generated by Labeljoy encoding the text (00)123456789012345678, which corresponds to AI 00 (SSCC-18).
Note that the last digit in the symbol is 5 (not 8) because it is the correct modulo 10 check digit.
2 – Creating a SSCC-18 barcode
Please go to SSCC-18 dedicated page.
3 – The Global Trade Item Number (GTIN)
GTIN is a number that uniquely identifies a product throughout the world. In the GS1 system it corresponds to AI 01.
It consists of 14 digits, the last of which is the check digit.
Basically, it is the GS1 version of the global product identifier, whether this is EAN-13, UPC-A, UPC-E, EAN-8, or ITF-14. The GTIN number is also issued by local trade authorities, which vary from country to country.
For example, if you are in North America, your product will most likely be globally identified by a 12-digit UPC-A number. To convert this information to the GS1 version, just prefix this number with two zeroes. If you are in Europe, your product will be identified by a unique EAN-13 number. In this case, you have to prefix it with a singe zero, to convert it into a GTIN-compliant number.
Note that zero-prefixing of your existing ID does not affect the modulo-10 check digit. Labeljoy will check this anyway, but probably nothing will change.
In this example, we assume that we are a European company whose product has the following EAN-13 global identification number: 2003659821451.
We will convert this to a GTIN number by adding the corresponding AI number and also prefixing with a zero to achieve the correct number of digits: (01) 02003659821451.
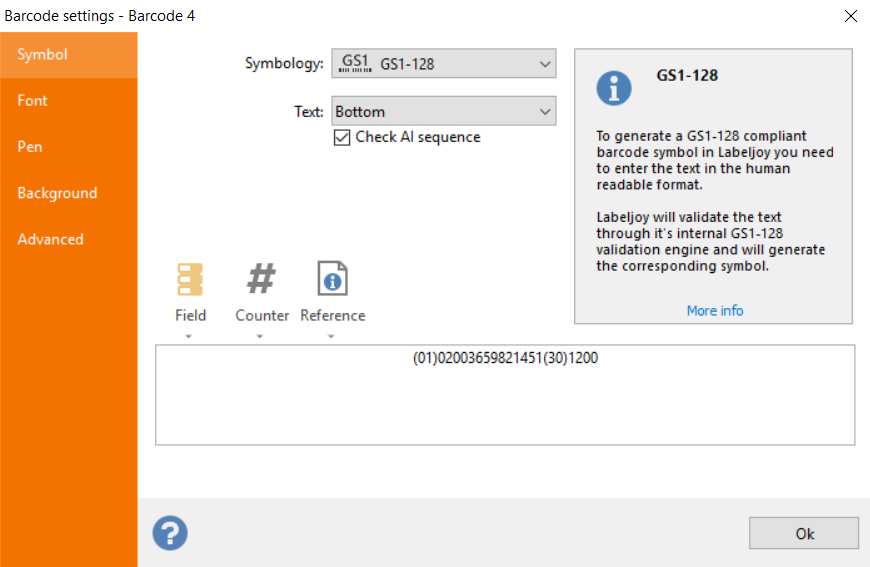
Now, if you enter this number in Labeljoy while the Check AI sequence option is checked, you will get the following:

Labeljoy detected that this particular AI cannot exist on its own, since it would have no meaning in the GS1 world. AI 01 was conceived to be paired with at least one other AI number that contains additional information about this particular item.
For example, we could add information about weight, dimensions or the quantity of items shipped.
So we add AI 30 (number of items), which indicates the number of items included in the shipping unit.
We pretend to be shipping 1200 units of our product.
Since AI 30 has a variable length, we do not have to add zeros. The text we enter looks like this:
(01)02003659821451(30)1200.
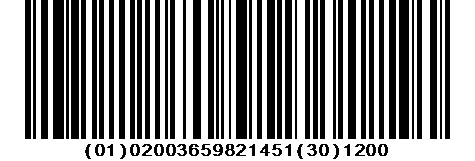
In terms of GS1 language, this shipping unit contains 1200 pieces of the EAN-13 article 2003659821451.
Labeljoy validates this input, detects no problems and generates the following barcode symbol:
4 – A real example
Now we create a real logistics label following the GS1 guidelines.
We start by setting Labeljoy to create a 105 by 148mm label (as described on page 24 of the GS1 document):
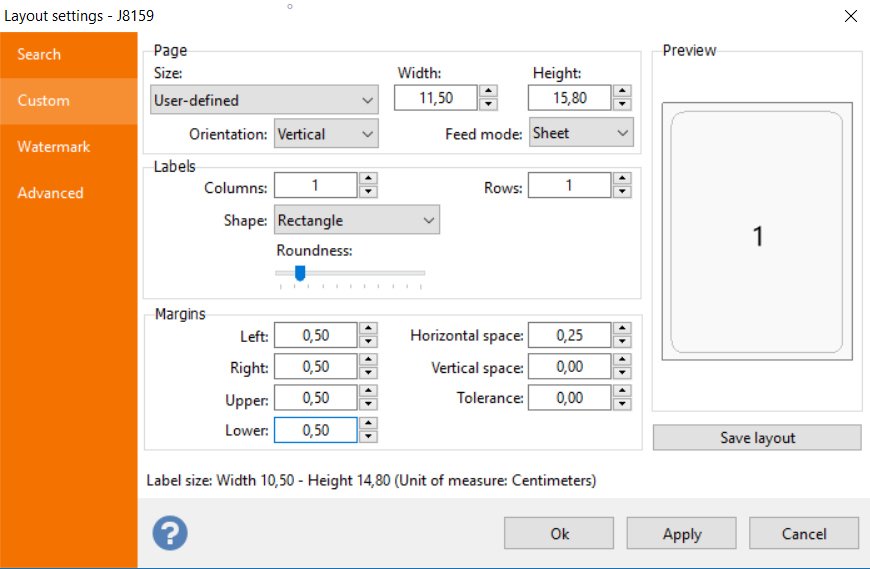
Note that the page size is slightly larger to leave room for margins. The layout must be created considering your printer and paper requirements.
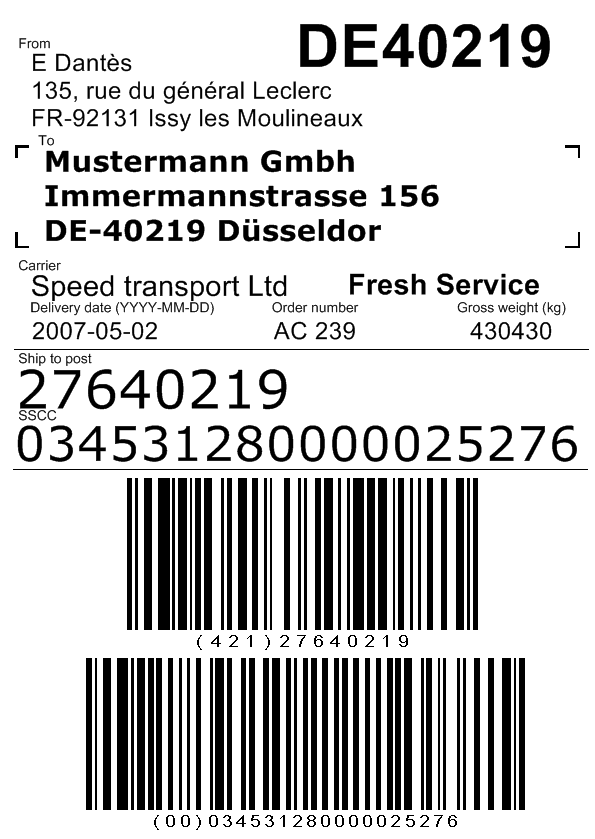
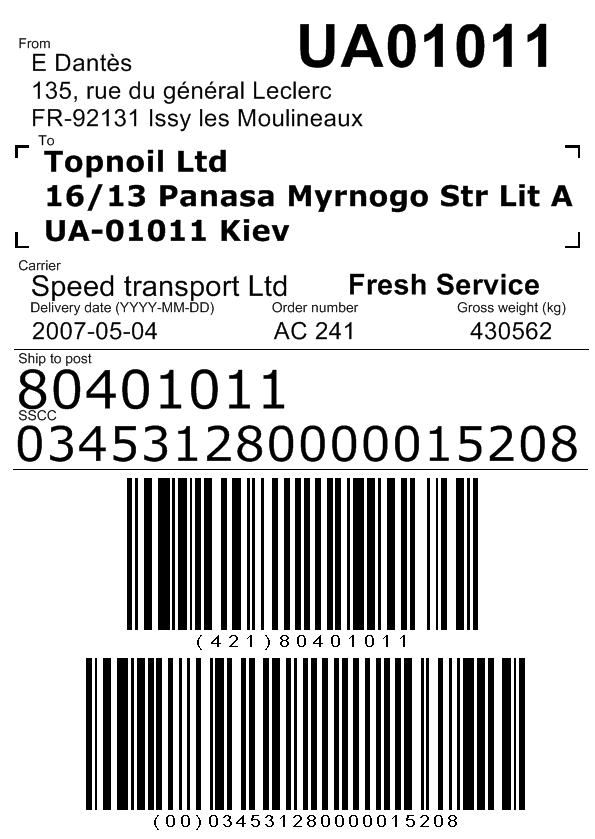
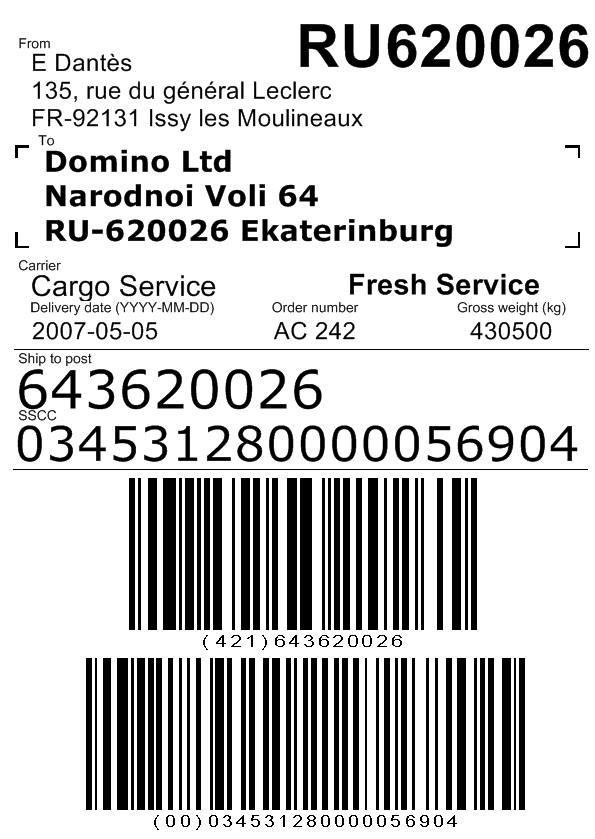
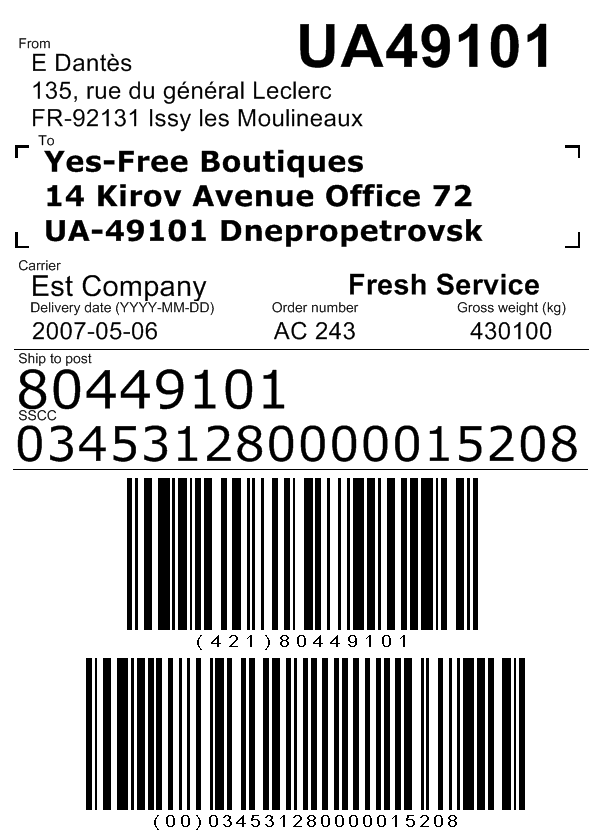
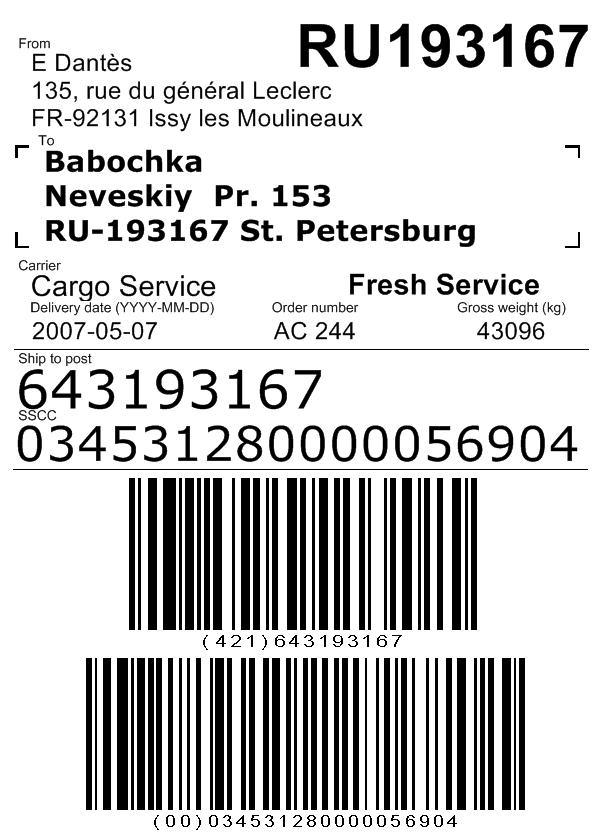
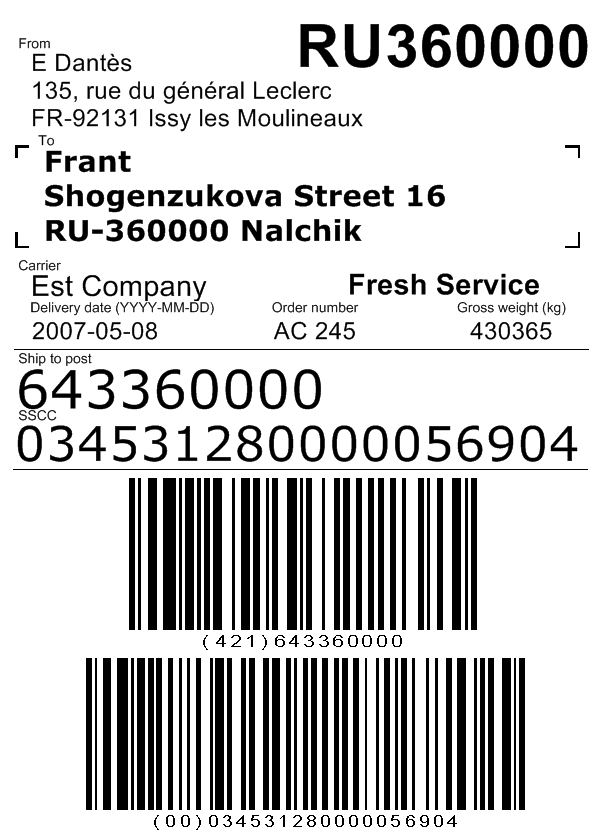
We now add all the elements of the logistics label, which can be found on page 14 of the GS1 document:
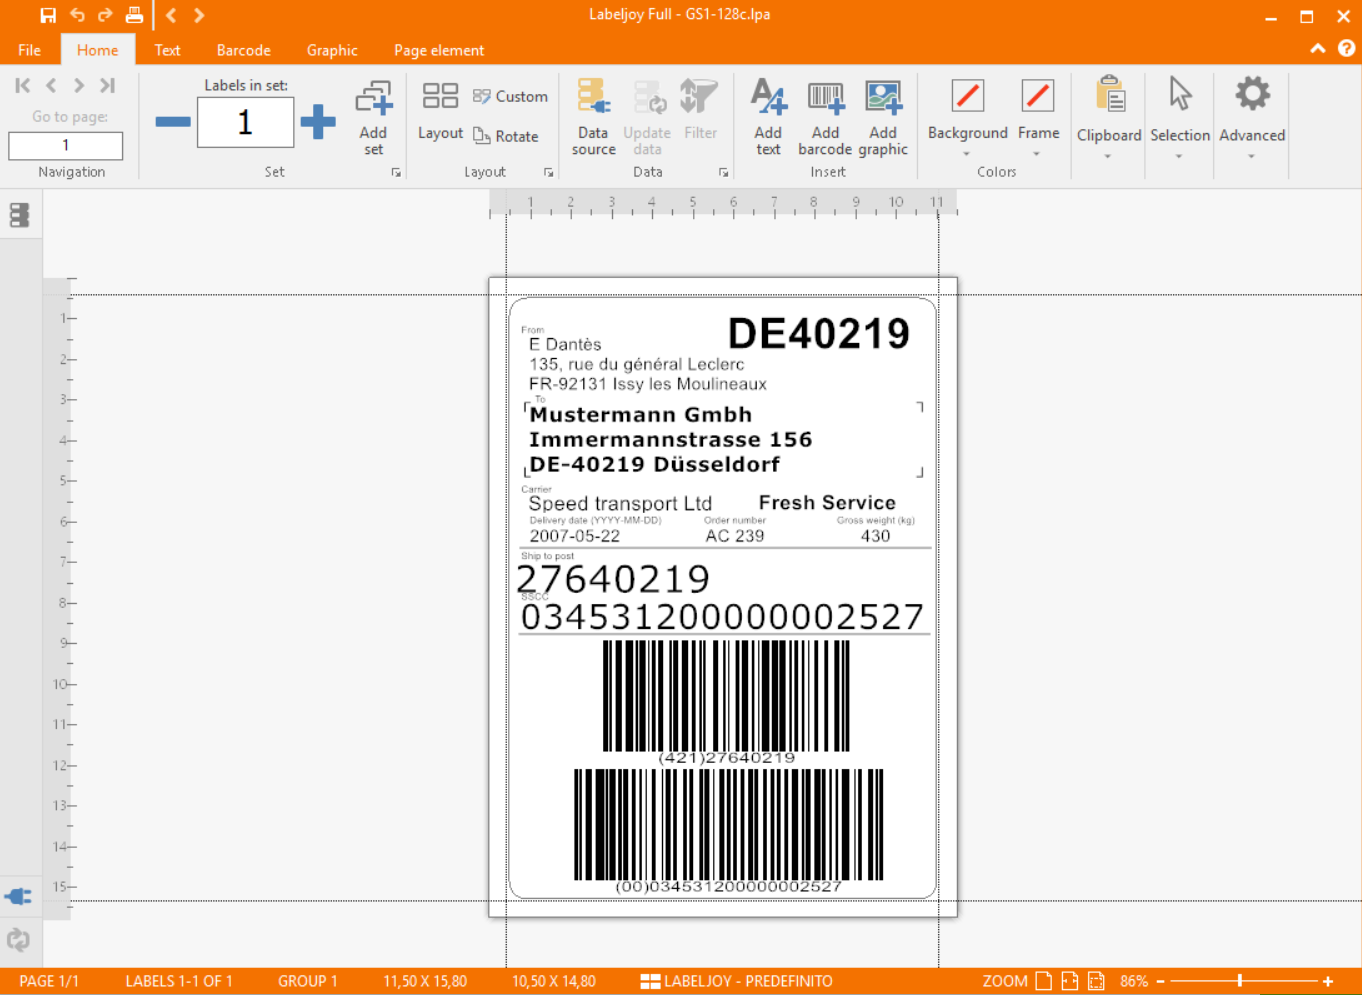
This is a typical GS1-128 logistics label containing three groups of information: supplier, customer and carrier.
The top section contains shipping information, the middle section the visually readable data and the bottom section the barcode symbols.
5 – Connecting data
If the data displayed on your GS1 label is contained in a data source (Excel or Access file, SQL Server, MySQL, etc.), you need to connect your Labeljoy file to the data source and connect each element to the corresponding data set. For more information, please refer to this tutorial video.
For our example an Excel file is used:
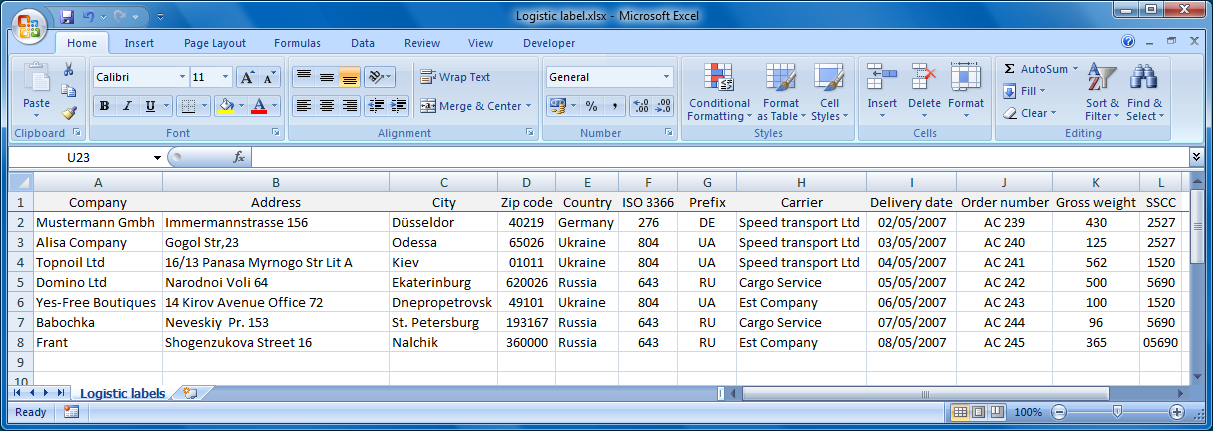
Not all the information we need on our label is ready for inserting. Some of the data needs to be computed by concatenating existing elements. We will see how to do that with Labeljoy.
But first we have to link the label to the data source. We could also use the Data wizard for this, but for the time being we are going to manually set up the connection using the Group settings form:

Once the data has been loaded, the Filter and sorting tab should display a grid with the fields and data of the Excel file:
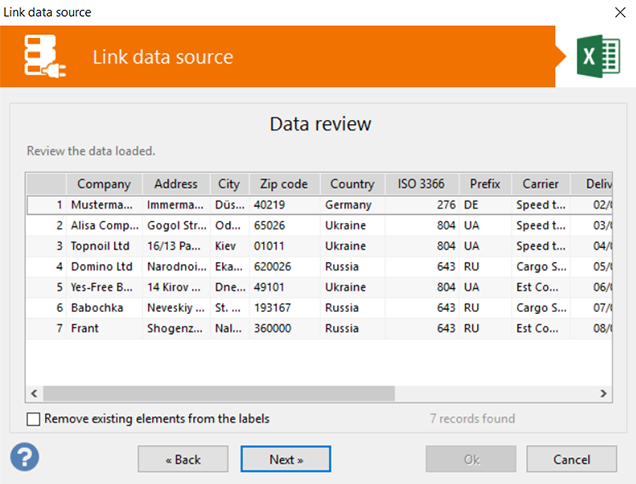
When we confirm the data link changes just made, the page buttons in the top toolbar become active. We have a single label per page and since our data source contains 7 rows, Labeljoy allows scrolling through 7 pages, 1 row per page.
Now every variable element on the label must be linked to the correct field in the data source.
We start with the large ZIP field in the top right area:
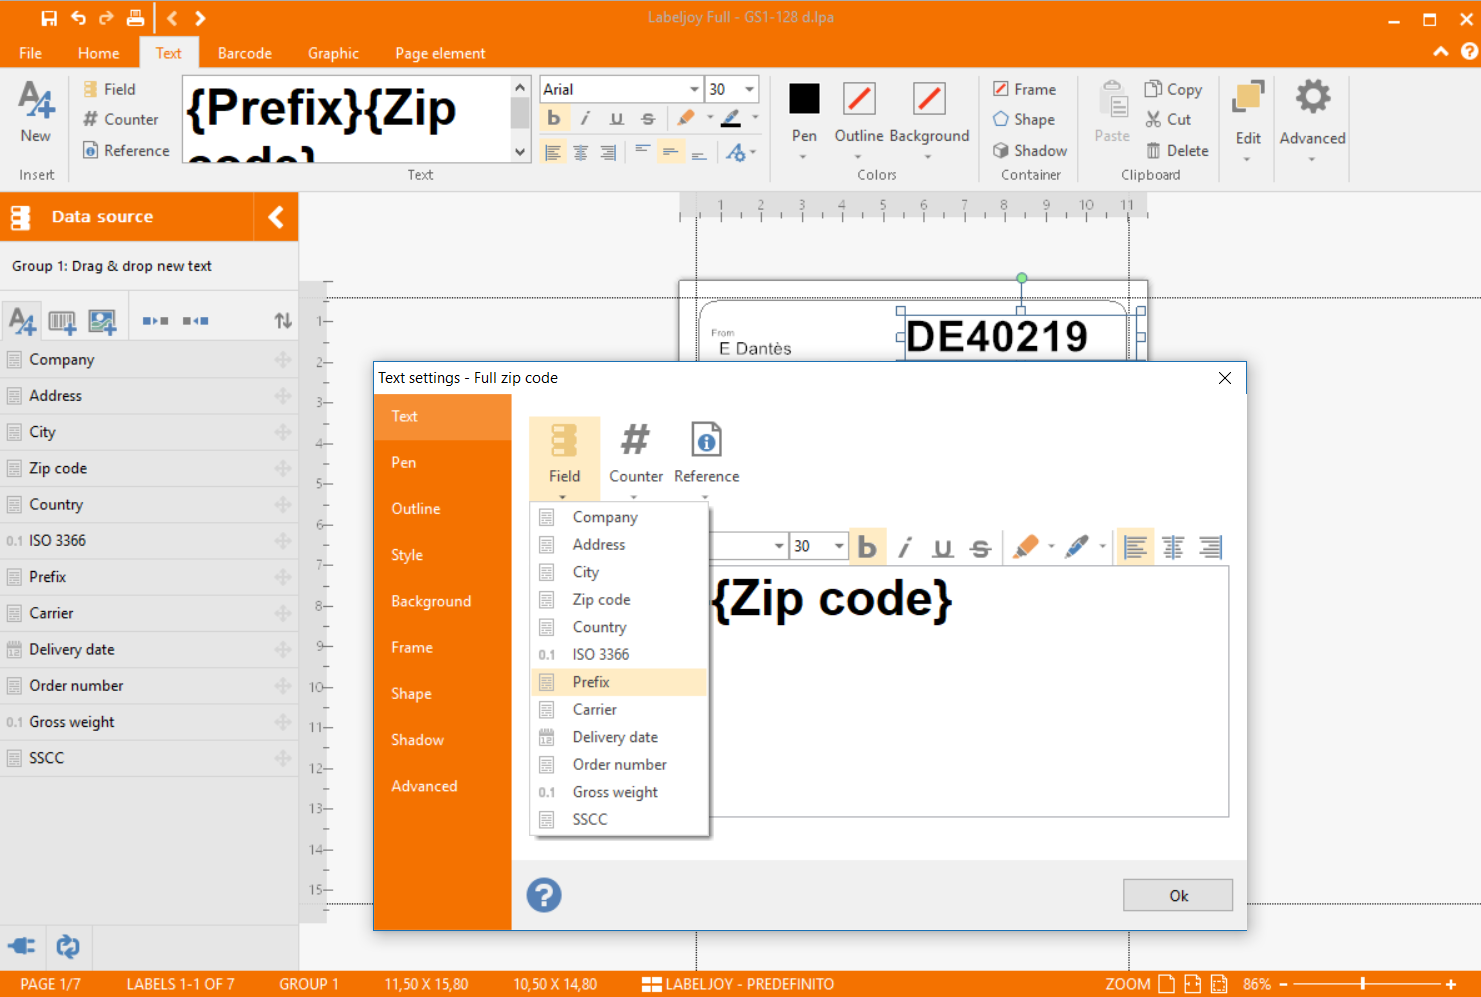
As you can see, clicking the Field button displays a menu with the list of available fields. In this case, we need to link the Prefix and the Zip code fields by selecting them both, one after the other:

Next we will work on the destination address. The sender address remains unaffected, since always the same company will be shipping out the goods, we can leave the From field in its static form.
The To field has to be linked as follows:
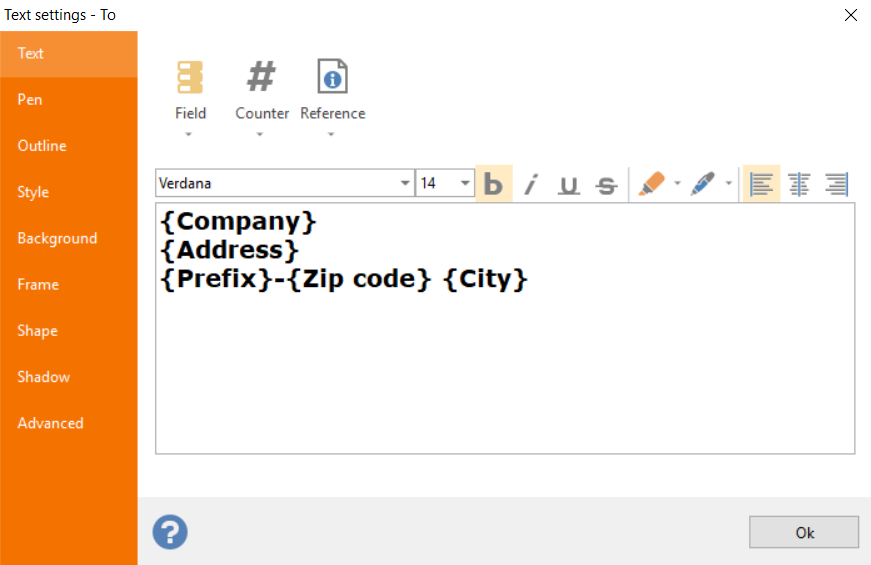
Note the dash sign between the fields Prefix and Zip code and also the space between Zip code and City.
The fields Carrier, Order number and Gross weight can be linked directly to the corresponding fields of the data source, no additional linkage is required.
The field Delivery date needs special attention: the format of the date has to be defined. As indicated on the logistics label, this date has to be in YYYY-MM-DD format. With Labeljoy special formatting can be defined for each field added to the element.
Double-click the Delivery Date element, link it to the Delivery Date field, and click the link in the text box to bring up the Field Editing window:
Select the Quantity field from the drop down menu:
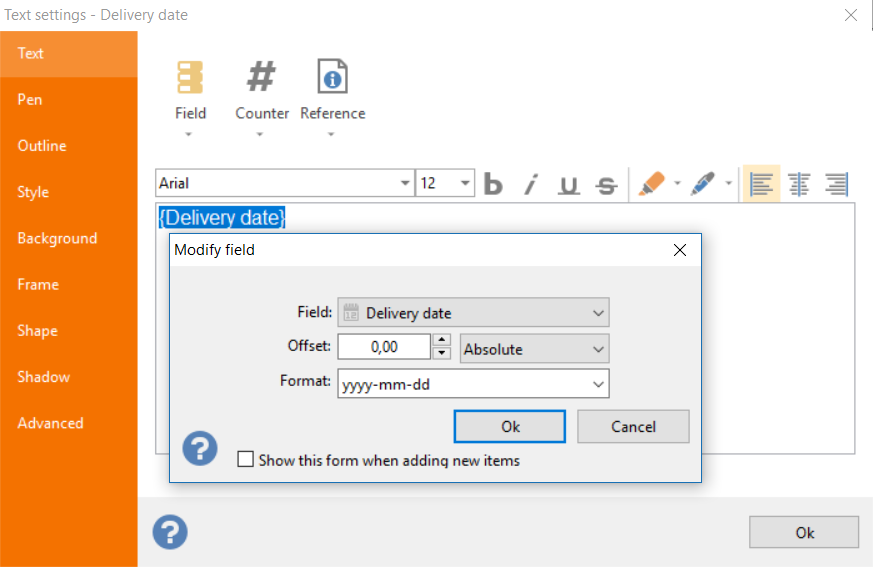
As you can see, we entered the correct date format in the Format text box. This instructs Labeljoy to display the date in that particular format.
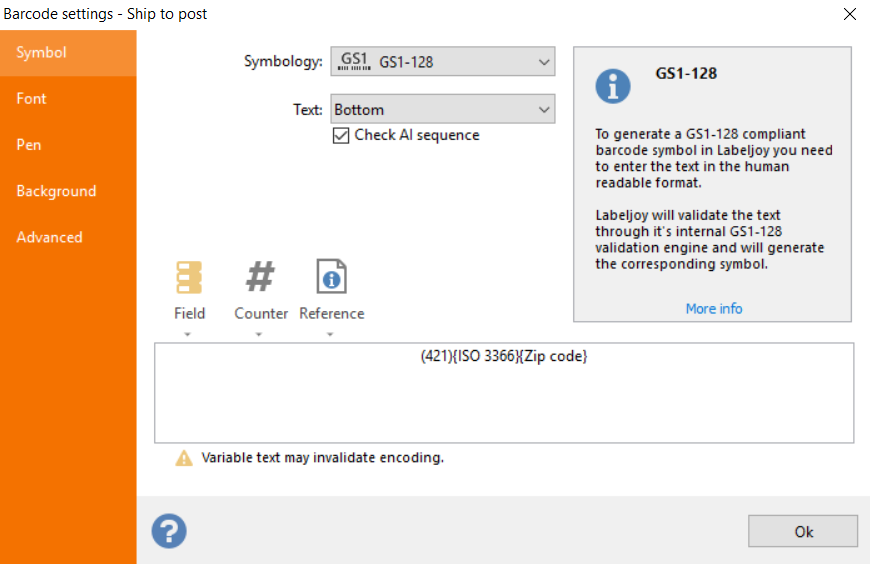
Moving on, the Ship to post field is the concatenation of the ISO 3366 and the Zip code fields.
The same concatenation must be entered in the corresponding barcode element, only we need to prefix everything with the static text (421) to instruct Labeljoy to treat it as AI 421:
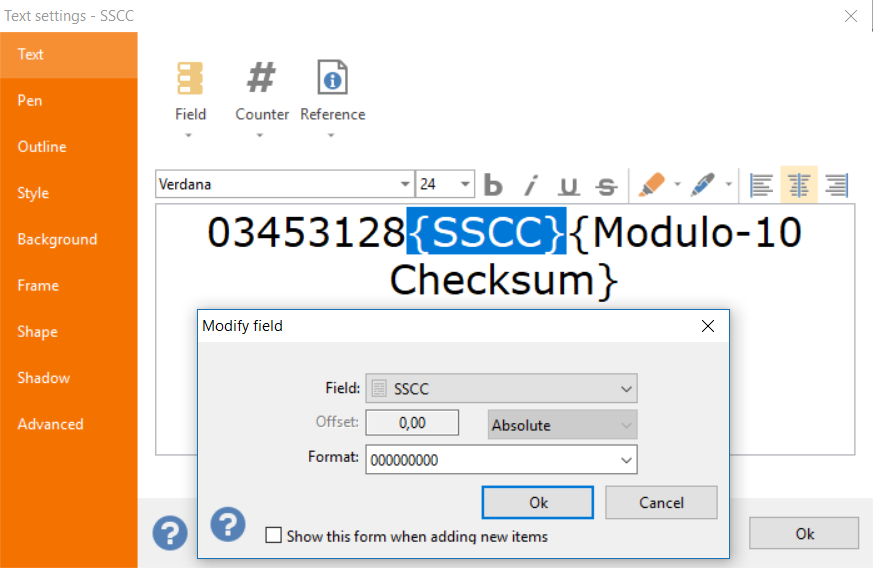
The SSCC text element must concatenate the static text 0 (Prefix) 3453128 (a 7-digit made up company identifier), the value read from the field SSCC and manage the check digit.
Now, since prefix + Company identifier + Check digit sum up to a total of 9 digits, we need to ensure that the SSCC value read from the data source gets zero-padded properly so that the total number of digit is always 18.
Double click the SSCC text element and enter the static text 03453128. Now click on the Field button and select the SSCC field. Finally, click the Reference button and select the Modulo-10 Checksum reference.
Now click on the gray SSCC field to visualize the properties form. In the Format field, enter 000000000 (9 zero’s). In this way, Labeljoy will zero-pad each value until a total of 9 digits is reached. This will also properly handle the last row of the data source which happens to be made up of 5 digits instead of 4 like all the other rows.
The Modulo-10 Checksum reference adds a Modulo-10 check digit to the number sequence immediately preceding its insertion point.
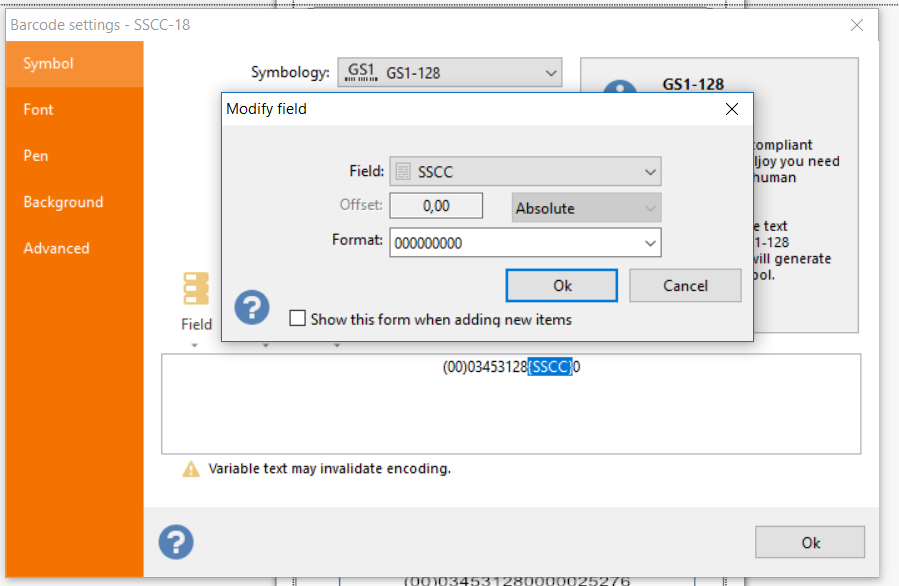
The same applies to the SSCC barcode element. It just needs to be preceded by the text (00) in order to instruct Labeljoy that it should be treated as AI 00.
For demonstration purposes we choose a different approach. Since Labeljoy knows this is a GS1-128 SSCC barcode element, we do not need to add the Modulo-10 Checksum reference at the end of the sequence. We only enter a static 0, which is converted to the correct modulo-10 check digit.
The final result are seven ready-to-print pages:
 |
 |
 |
 |
 |
 |
 |
