layout definition
In-depth resources:
Video: Manage and choose layouts
Video: Printing using a roll printer
Tutorial: Working with roll printers
The
layout dialog box
enables you to enter the parameters that define
paper size,
label size
and their coordinates on paper. In the right side, a preview
is visible that shows how changes affect the layout on paper.
Note:
The changes made here to paper size and orientation will also affect the current printer settings, depending on the Synchronize page format
setting in the Print
tab of the Options dialog box.
In the event the selected printer does not support the
newly defined layout settings, the data shown on screen may not print correctly.
In case you need to change the printer paper size, it is strongly suggested you use the
advanced printer settings dialog box.
The dialog box contains 4 tabs.
|
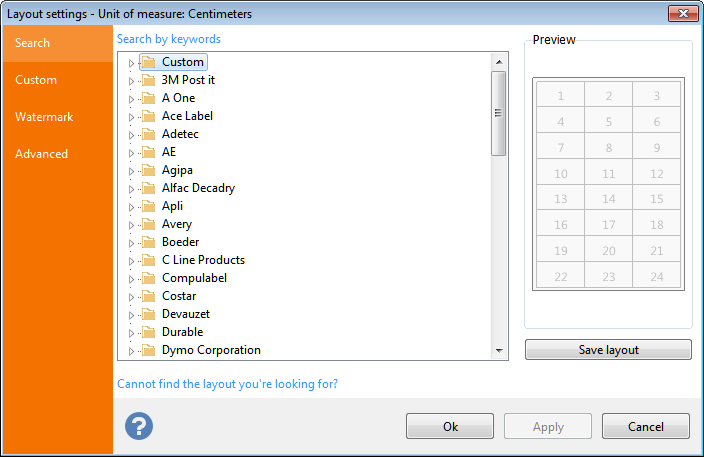 The first tab enables you to select a layout from Labeljoy's internal layout library, which includes the most famous label manufacturer brands as well as your customized layouts, always shown in the top category Custom. The first tab enables you to select a layout from Labeljoy's internal layout library, which includes the most famous label manufacturer brands as well as your customized layouts, always shown in the top category Custom.
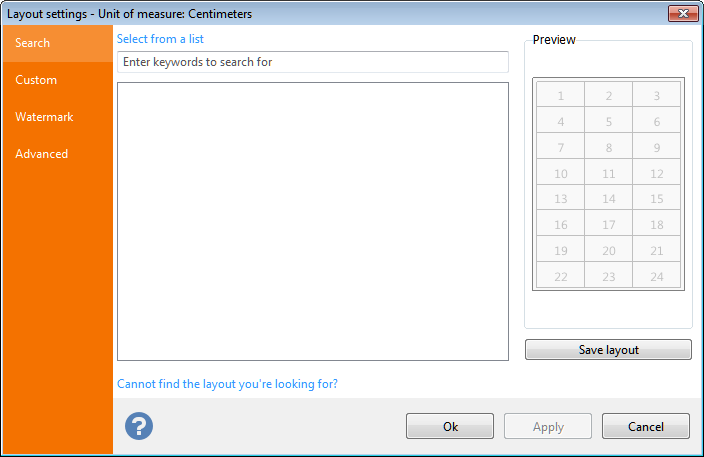
Click Search by keywords to activate search mode based on one or more keywords. |
|
 It is also possible to search for an existing layout file in Labeljoy's layout library. It is also possible to search for an existing layout file in Labeljoy's layout library.
In the Enter keywords to search for text box, enter a text to search for in the file name. For example, if you need to find all the layout files whose name include the word Address, enter Address and click the Search button. All files with names such as Address J8562 or Address 003R96245 will be found and listed.
Click Select from a list to go back to brand browsing mode.
|
|
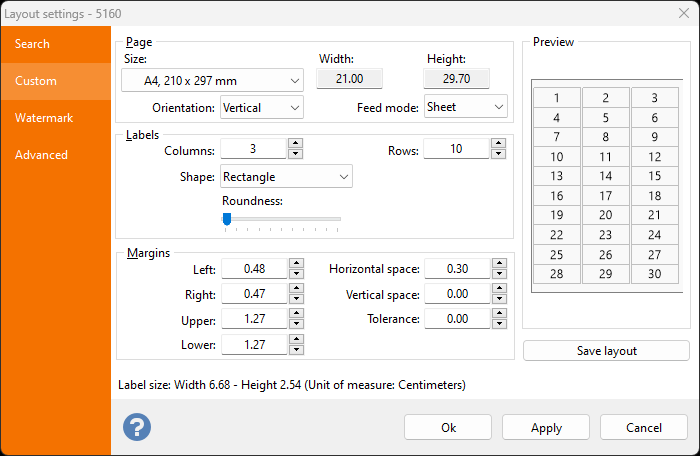 The second tab, Custom,
enables you to define the following parameters: The second tab, Custom,
enables you to define the following parameters:
- Page: in this frame you can define physical paper size. The combo box enables you to select a standard format or, by selecting the last item user-defined, define custom paper sizes. By doing so, the text boxes Width and Height
will become enabled and will let you manually enter paper size values. Also, by acting on the combo boxes below, you can define paper orientation (horizontal
or vertical) and define the type of paper used (sheet
or fanfold). This last setting does not affect printing; it just instructs Labeljoy to draw on screen the typical fanfold paper holes present near the left and right edges of this type of paper (normally used with continuous feed dot-matrix printers). Note that the left and right margins must be at least 0.03 inches wide (7.5 mm) to enable the holes to be rendered on screen.
- Labels: in this frame you can define the sheet layout, meaning the number of label rows and columns present on each paper sheet. You can also define the label shape.
- Margins: in the Margins
frame you can define the inner paper dimensions used to calculate labels coordinates. The values set here, together with the number of rows and columns, will define label sizes. The values are:
- Left margin: space between the left paper edge and the first label column.
- Right margin: space between the right paper edge and the last label column.
- Top margin: space between the top paper edge and the first label row.
- Bottom margin: space between the bottom paper edge and the last label row.
- Horizontal space: spacing between label columns.
- Vertical space: spacing between label rows.
- Tolerance: space used outside label edges (if any) on which you want to enable printing.
The resulting label size will be shown in the lower side of the dialog box. A message will be shown in case the settings result in an invalid layout.
Note:
Sizes shown here will be in inches or centimeters according to the Unit of measure
setting defined in the Appearance
tab of the Option dialog box.
Inch fractions can be entered through a popup menu, as explained in the topic manage inch fractions.
Click the Save layout button if you wish to save the customized layout in the Custom category.
|
|
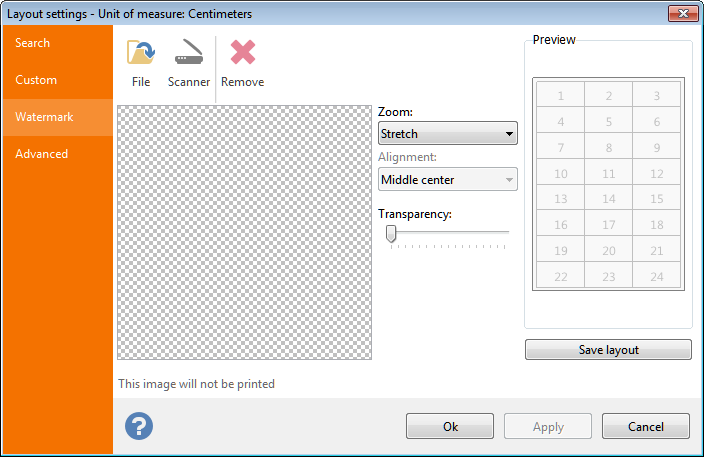 The Watermark
tab enables you to load an image that will be displayed on screen
only, behind all elements. The Watermark
tab enables you to load an image that will be displayed on screen
only, behind all elements.
The image loaded here will not be printed. Its only purpose is to
facilitate building label templates
to be used when you need to print on pre-printed forms.
The background image to be used here needs to be created by
scanning the original form, ensuring that the image is of good quality,
and the source form paper sizes are honored. See working with images
for details.
|
|
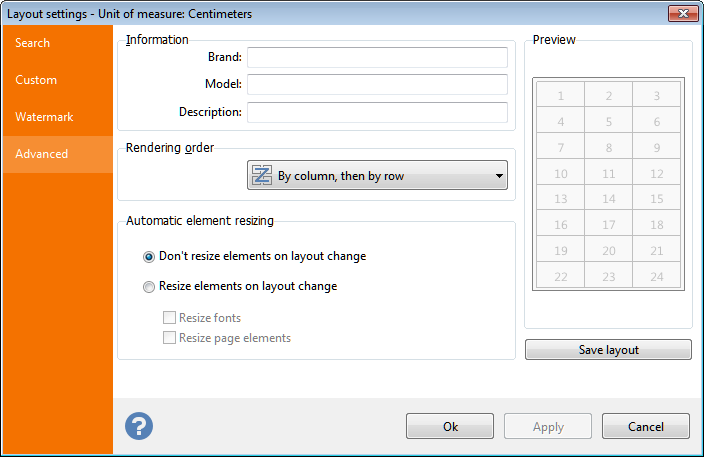 The Advanced tab
enables you to define additional information about the brand, model and a description of the current layout. Note that the text defined in the Model
field will be shown in the status bar. The Advanced tab
enables you to define additional information about the brand, model and a description of the current layout. Note that the text defined in the Model
field will be shown in the status bar.
It is also possible to define the rendering order with which the labels will be drawn on paper.
By column, then by row (default) makes the rendering order proceed first horizontally, then vertically. For example, in a layout with 2 columns and 5 rows, labels will be rendered with the following order: column 1 then column 2 of row 1, column 1 then column 2 of row 2, column 1 then column 2 of row 3, etc.
Vice-versa, By row, then by column makes the rendering order proceed vertically, then horizontally. In the previous example, that would be: row 1 then row 2 then row 3 then row 4 then row 5 of column 1, row 1 then row 2 then row then row 4 then row 5
of column 2, etc.
Note:
This setting has effect on layouts made up of more than 1 row and more than 1 column
Also this functionality is useful only when a text counter is present or there is a data connection. Or when a partially used label sheet needs to be printed and the first columns are missing.
Finally, In this tab you can activate the Resize elements on layout change
global option: if this option is enabled, whenever the layout changes because of manual adjustments, all elements coordinates will be proportionally adjusted
to the new label size.
If the Resize Fonts
option is checked, all font sizes will be also be proportionally adjusted.
If the Resize page elements option is flagged, all page elements
will also be resized accordingly. |
In case the layout defined here will generate partially printed sheets in the bottom area, due to printer limitations, you might consider sub-dividing the layout into two separate layouts. See automatic layout partitioning
for details.
Note:
When the new layout is applied to the current job, the number of labels per page may change according to the new settings in the Rows and Columns fields. If the current job is not connected to a data source, then Labeljoy might ask you if you need to adapt the current label number to the new layout.